Reaching well beyond my grasp

I am here because I have been inspired. The Bloodbowl community has created some amazing customised teams and I have decided I'd like to try building my own team.

I have never done this before, my painting skills are mediocre at best and my modelling skills....well non existent. This is in all likelihood a doomed journey. But I hope it gives others of my skill level and ambition the courage to try.

This is my first attempt at blogging, so some things I feel you should know.
The good blogs out there post on a weekly basis, yeah... this isn't going to be one of those good blogs.
Also I take terrible photos. Really. You have been warned.

UPDATE: I have added a Lessons Learnt page. Here I note little tips I learn as I go along. A summary of things that may help others who decide to give kit bashing a go.

Monday 20 November 2017

Blitzer Lineman switch.

Painting the Lineman and looking at the rest of the team I decided to make a minor change in terms of team player aesthetics. The first lineman model I had done had an open helmet, so you could see the orc's face.


One of the four blitzers was a similar model to the line men. The other 3 all had full helmets and a bit more armour on. I want all the different types of players to all have a similar look. That way it is a bit easier to identify what is what. To me the full helmet models looked more like blitzers and the open face models in the lighter armour were more like lineman.

Fortunately I hadn't glued on the barrel to the blitzer model. I put together another blitzer to match the other 3 and painted up the other model as a lineman.


So now I have 2 line man ready in the wings. Even though they are the same model I have made same minor changes in the paint scheme while trying keep the overall team colours. I haven't decided which I prefer yet, the black helmet or the orange helmet with stripes.


The 3 Blitzers that had the same type of armour. 


And the "new" model biltzer to match the others. As you can see this one has been undercoated so hopefully the blitzers will be painted soon.

Most people won't see or understand why I would want the different positions to have a similar look. But I really notice these visual details and think they help me see the board in play better. You certainly could argue that the fact that all the blitzers will have barrels on there back should have been enough to visually group them together,  but to me it makes sense for the models to all be similar, that way I have a bit of lea way when it comes to the paint schemes. I don't think an Orc's kit would be very uniform in colour scheme, so having that team uniformity in size and shape helps counter that.

All the Blitzers look physically similar.
All Lineman look physically similar.
All the Black Orcs look physically similar.

 This feels right to me.


Sunday 22 October 2017

Lineman lined up.

With my test paint models done I had a better idea of the look of the team I was aiming for and what I need to do and improve on to get it just right.

I decided that rather then continually practice on test models I would paint the first on team model. This way I was committed to the project of painting the team and was forcing myself to concentrate harder on the job in hand. No more test painting safety net.

Well.. sort off.

I came to a compromise with myself. I decided that the first on team model to be painted would be an Orc lineman. Now originally there were no line man in the team roster, but I figure in a league, players will get injured and need replacing, journeyman may be necessary, so a lineman or two seemed like a sensible ideas. Also I hope that with each figure I paint I get a little better, so logically the first models won't look as good as the last models painted for the team. I would rather have the line man look less well painted then the other positional players.


I like the split of Orange and Black on the model 


Using the plates of armour on the legs also works better than trying to do the stripe pattern in the knees and elbows.


I struggled a bit with the stripes. As you can see from the two shoulder pads I am still working on a tiger stripe pattern I can do well and be consistent with. I think the right pad has too think black markings. Not sure the left pad looks stripey enough.


Really happy with the black and orc skin in terms of shading and high-lighting. I wanted to try the model with an Orange helmet. I like how it looks terms of colour, but the stripes need to be much better. I need to improve how I control the paint on the brush and the amount of paint I put on.


I think this will be the template/ format for the rest of the team in terms of uniform.

Friday 29 September 2017

Test paint #2

I had another go at trying paint the team colours/kit, as well as settler on the kit scheme.
This time I limited the orange to knees, elbows and shoulders.


 The legs/ trousers were also painted orange, although i am not sure whether there is enough contrast between the legs and knees.

 The tiger stripes I kept horizontal, still feel I need to improve on them, make them thinner.


I tried to not go over the top with the stripes, I think the shoulder pad came out quite well, I also like that it is only on 1 shoulder.

 I like the top of the helmet being orange, although in this case the stripes turned into small triangles. I might make some of the other models helmets all orange with stripes.

 Overall I think this is an improvement over the test paint #1. I think the balance between the black and orange is better. I may limit the stripes to the shoulder pad, purely because it is really tricky to paint stripes on small curved surfaces like the knees and elbows. I would like the helmets to have stripes too but not sure if that will work with every model.
I am thinking that I may leave the elbows as orange without the stripes, paint the knees black, and then paint the diamond flat pieces of plate armour above the knees orange with stripes. That might be easier to pull off.

I also wonder if some of the armour plate "patches" on various part of the mode; should be orange?

Sunday 17 September 2017

Test Paint #1

I consider myself to be a below average painter. It is not a part of the hobby I particularly enjoy. painting time is taking up playing time is my general attitude.

I like to base coat, shade, dry brush, ink wash as quick as possible. Then I am happy to put on the table to play.

I have tried to improve my skill with the paint brush and tried different techniques. These days when I paint I tend to rely on ink washes and glazes. I find it quick and easy and gives a finish I am happy with.  I will start with a white undercoat and then apply a very light colour as a base. I then add wash after wash to the model. The ink adds darkness to the shaded areas of the model while the light base coat comes through on the highlighted areas, I then finish with a glaze or two to smooth out between the light and dark.

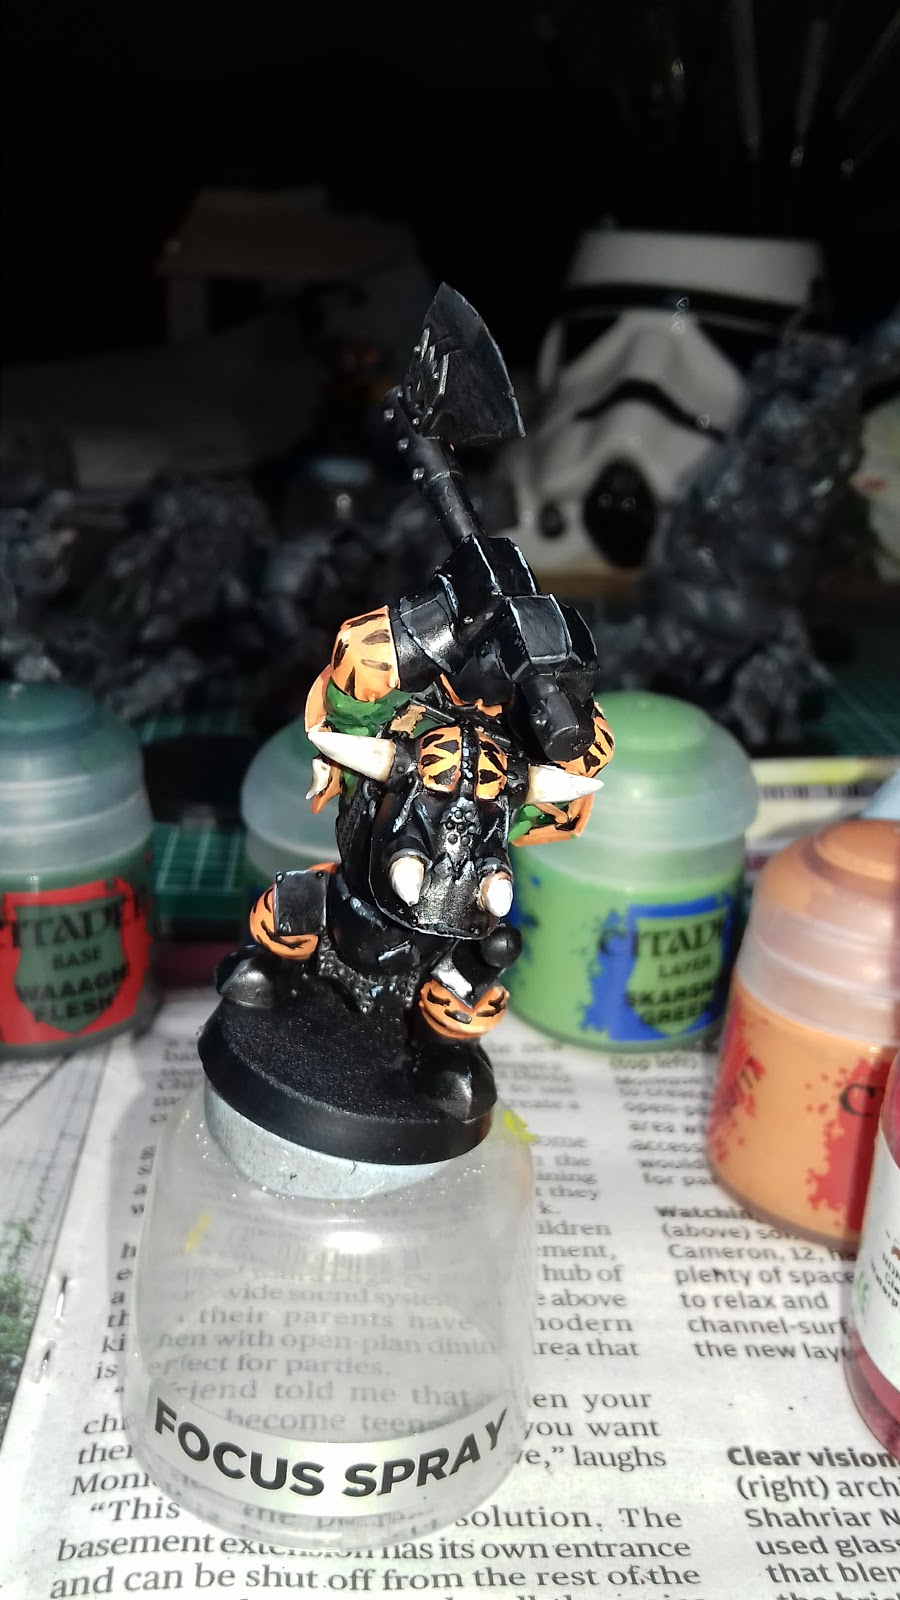
This works fine for models that are largely one colour and have just one type of surface ( i.e. scales, armour, skin etc.) Using my usual painting technique  with the Orcs would be trickier and slower. Because I wanted to do a tiger stripe pattern I didn't think it would work very well. I also wanted to try my hand at the GW method of layering.

The primary colours for the team would be black and orange, and of course green for the skin. I watched some you tube videos, and checked some GW painting guides and websites.

I went and got the following colours to paint in the layer method.
Ork Flesh:
Waagh! flesh (base); Warboss green(layer); Skarsnik green (layer); Bei-tan green (ink shade); Waywatcher green (glaze)

Abaddon black (base); Eshin grey (layer); Fenrisian grey (layer); Agrax earthshade(ink shade)

Jokaerg orange (base), Troll slayer orange (layer); Fire dragon bright ( layer); Lugganath orange (egde); Reikland fleshshade (ink shade); bloodletter (glaze)

I wasn't sure if I would use all the of them, particularly for the armour there would only be hard edges and I didn't think there would be much need for multiple layers.


I wanted to practice painting black, as I haven't really painted with black very much.

I started by giving the model a black undercoat then base coating the skin, drum and drumstick

The Chain mail was dry brushed on and pants were painted.

I then did a ink wash on the skin, drum skin and orange bits.


Applied the base coats again over the raised areas and did the first layer of edge highlights for the black armour 


A lighter shade of green was applied as a layer on the areas I thought would be lighter.

Lighter layer for the orange.


A final layer of highlights was added and some details picked out. I tried to get the thinnest, cleanest, sharpest lines I could for the final edge high lights on the black.


I have to say, at this point I was really pleased with how it came out. That is one of the best paint jobs I have ever done. The black looked clean and the highlights looked sharp. I really surprised myself with how well the skin looked. I honestly didn't think I had the skill to produce something like that.


This had given me a lot of confidence to work with black, and to use the layer style of painting. I realised my past mistakes when attempting to paint like this. After the ink wash shade I would apply the first highlight layer, rather then reapply the base coat. 


So with the painting test a success so far I decided I would try having a go at painting the stripes I wanted the team to have. Normally It would be black on orange, but with the model it would be orange on black, it would be interesting to see if that would work.........


AND RUINED.


Ugh! So my stripe painting needs a lot of work. Probably less stripes and limit to shoulders, knees and elbows ( and maybe helmet too). Definitely black on orange too.


Hmm.. I feel this practice was mostly positive. The orc skin layering came out really well ( for what I can normally achieve). I feel a lot more confident when working with black. The stripes, while coming out pretty bad, have helped clarify what I need to do and how I want the paint scheme to look like

So I think another practice paint attempt is needed with what I have learned.

Sunday 10 September 2017

The Orc thrower kit-bashing dilemma

When it comes to the throwers I find myself in a bit of a quandary. The Kits I have been using so have have been really good to make the Orc bloodbowl team I want. But none of them have anything I want to use for my throwers.

Now I have some ideas of what I would like my throwers to be doing. I think the standard thrower pose that you get for most teams is okay, but a bit unOrcky. The one arm outstretched pointing at something across the field the other holding the ball, arm bent ready to throw. You know the one I mean.


I just think an Orc would never look that accomplished at throwing.
My idea is to get an Orc thrower to look like it is doing a rugby throw in. Two hands on the ball just above their head.


To me that feels and looks how an orc would throw the ball.

So I find myself in a situation where I could just add the standard bloodbowl orc thrower miniature, which would look fine and in keeping with the squad with some minor armour adjustments, or I could buy some miniatures to make the throwers I won't. The big thing here is cost and to a lesser extent time.

With the current range of GW models I could have just bought an Orc team. Kit bashing is the more expensive option. If there was a team not yet available that you want, then kit bashing one is a good option, but if the team is available, like the orcs are, it becomes a balance between cost and creative freedom. I really like how my Orc team is looking, I like that it will be different to the standard orc teams. But is it worth it to buy some more models just to make the 2 throwers? Sure I have an idea of what I want them to look and I have seen a couple of models that would do the trick.


This guy is almost exactly what I am after. Head looking up slightly, one foot in front, correct armour. I would just need to work on his arms. they are up in the correct direction, they just need to be bent at the elbows, coming together to hold a ball. I say "just"; I actually have no idea, how to do that, if it is possible, and more importantly, if it possible for me to achieve.

 The Ardboyz Orruk kit I have includes a couple of arms holding an axe or mace in both hands. Again this is almost the right pose. I would need somehow reshape the hands to be more open to hold a ball. This would be highly fiddly, and require high levels of accuracy when cutting. Some green stuff work would also be required.

Then there are these guys. I mean look at them! They are 90% there already! Would need armour and thats about it. They how ever come part of another kit. Should I buy a whole kit of 20 odd models just for those two?

I know I said I didn't want to use the non-classic thrower pose, but you know what? I like this guy for it. The lifted leg and pot belly sells it for me. Again a bit of work with the hand that would have the ball and armour requirements.

So that is where I am with the thowers undecided. Ultimately it comes down to create freedom and following through on my design/theme ideas, or just filling in at the fraction of the cost.

Sunday 6 August 2017

Big Toof Troll

The Badlands Big Toof Tigerz were going to have a troll. I also knew that eventually I was going to get myself a goblin team, which would have two trolls.

Fortunately I had the GW river troll set that came with 3 trolls.

At first I thought I would only use two of them, but then realised that I wanted to paint the Orc team troll in the team colours. I was also pretty sure that my Goblin team would have different team colours, which meant if I used the orc troll in the goblin team it wouldn't have the same team colours.

I could  paint the troll in a neutral scheme, but since I had 3 trolls I decided to use all 3, one for the Orcs and two for the Goblins.

I will come back to the Goblin Trolls at a later date. After the Tigerz are completed.

I started by thinking how I wanted the troll to look. One idea I had was that the troll was imitating a troll slayer. I would give it a mohawk and fake beard. But I also wanted the troll to have armour to fit in with the rest of the look of the team, which didn't fit with the troll slayer idea. In the end I put the troll trollslayer idea to one side.

I found the river troll set from GW to be really good. Lots of parts to play with and good value for money. I understand it is no longer being made due to it not being AoS, so will be hard to find now.

I had brought a number of armour parts and bits from Bitzbox, a site that sells parts of sprues and bits of model sets. For the troll I had purchased an imperial guard orgyn breast plate and bits from an an Ork Deff Dread.


The Troll was given two fists with one raised above his head ready to smash down on anything in front of it. I had to cut a weapon away from one of the hands/fists. The breast plate was added on. It was the right size to cover the front of the troll and also the right shape, in that it looks a poor fit, which I think is in character for the model. I may try to add my own straps to it later.


 The large bit of ork dreadnought armour I put over the troll's left shoulder and back. Again the size and shape worked out really well. The only thing I am unsure about if the flat edge of the armour at the top of the shoulder behind the troll's head. I think it should maybe be look a bit more ragged.


 I wanted the armour to continue down the troll's left arm. I used an Orruk Shield. It covered the fore arm and the jagged edges over hung the troll's fist.


I then added a Orc motif to the front of the breastplate. I think this came from either the Stormboyz set or the Orruks set. I really like the effect of adding a bit of detail on top of something else has. I feel it gives the model  a bit of character and depth and helps add to the hodge-podge look of the troll.

While I didn't plan to at the start I ended up having the troll having armour only on it's left side. I quite like how that has turned out. I just wanted to find something for it's left leg/knee I will be happy with leaving it at that.

Looking through the sprues I had, the Stormboyz had rocket packs where the top cone of the rockets looked like knee pads to me. See below.
 It even had what looked like two straps across it.


I cut away the pins from the inside that would have been used to attach it to the other half of the cone so I could glue to the troll's left knee.

Pictures below of the Troll.


I am happy with how it has turned out. It needs some minor cleaning up/ cutting away of excess plastic. The only other thing that I would have liked to do is add some strapping to the armour and pads, but not sure how to go about that. At the moment it means some fine detail work with putty and I would rather find a cheat, then attempt to model in putty.

Tuesday 27 June 2017

Last Goblin fanboy

My 4 Orc Blitzers are each carry a goblin in a barrel on their backs.
I had sorted the barrels and put together 3 of the goblin fanboys ( as I have taken to call them). One with a catapult, one with a blunderbuss and one with a grabber.

The idea I had for the last fanboy goblin was for the goblin to have his arms up looking like he is about to catch a ball. The idea being the Orc and Goblin working together, the Blitzer facing forward running towards the endzone with the goblin on his back catching a ball for him. The kind of cheating you would expect from an Orc team.

I looked through the kits I had and found a goblin that was almost right for the job.
At this point I would like to apologise for the lack of photos of the original miniature. I forgot to take a photo of it before I started working on it. However I do have a photo of a picture from the Stormboyz set that show the goblin in question.

I wanted to use this model because it was standing up straight and had an arm up already .
The first thing I did was cut the left arm and re-glue pointing upwards. I then decide to cut away the hand holding the bomb-stik. Looking back, I can't actually remember why I thought that would be a good idea...

Below is what I ended up with.
Leaving the missing hand for a moment, the pose was okay. I would have liked the arms to be closer together, in a just about to catch pose, so that the goblin could actually hold the ball during the game if that Blitzer had it. But it still looked like the Goblin was "calling" for the ball, which seemed fine. I did briefly play with the idea of trying to re-position the arms by either physically bending them or cutting at the elbow and using greenstuff to put together again. But at this point I wasn't willing to try and remodel the arms, or make anymore drastic cuts.

And now for the bouncing squig in the room..the missing hand....yeah......

I think that I wanted both hands to be open and the right hand was in a fist. So I removed it with out really think about what I would do once it was removed.
I didn't have another open right hand I could use from another model. The two options I could think of were:
1) Use putty to make a mold of the left hand, then reverse it to make a mirror right.
2) Try and model a right open hand out of putty.

Neither option filled me with confidence. option 1 seemed much more do-able then option 2 though.
So the plan was to make a mirror of the left hand by making a mold. But before I attempted that I decided to try and "sculpt" a hand. I expected it to be rubbish, but I thought the practice would be good.

Yep it was laughably bad.

But from failure can come inspiration, and so it was for my hand less goblin. Looking at my horribly mis-proportioned, mis-shaped attempt, I saw an idea. Foam Hands!
That, I felt I could do, and it would fit perfectly with the idea of them being fanboyz goblins.

I decided to give the goblin two foam hands, rather then keep the hand that was okay and make the foam hand for the hand that was missing, I went and built on top of the existing hand.

It should be noted that when I get a little excited about an idea I tend to stop making sensible decisions. In hindsight making the foam hand for the missing hand first would have made more sense. I started with the shape being very flat, and planned to add layers of putty to give it some depth.


Overall I am really quite pleased with the idea. The execution needs improving but I am happy with the above model. I need to gain a bit of patience, control and concept of proportion in my modelling ability.
Now I know some of you will have had the same thought I did...why not "middle finger" the foam hands. And yes that would have looked funny, and yes it would have been in keeping with the mentality of an Orc team with Goblin fans. But I decided to keep the team family friendly. I am more comfortably with them that way. I want to be able to play with them anywhere with out worrying about age appropriateness.


Foam Goblin in his barrel.